
Step 1 – Understanding the Departmental Template
Each department agreed a template right at the beginning of the roll-out of Blackboard which was designed to give staff a framework in which to develop learning materials to make it easy for students to follow. This does differ from department to department, but it should not matter if all of the learning materials are clearly labelled and signposted. Familiarise yourself with your template. There are three available levels within the template.
Learning Modules
The top-level structure is made up of Learning Modules, typically by week or by topic. Learning modulescan contain both Folders and Documents as well as individual files e.g. Word documents, PowerPoint presentations, images, assignments and tests.
Folders
Folders can contain Documents and individual files. Only one level of folders is permitted.
Documents
Documents are structures in which text can be added via a text editor. In addition to this, files can be embedded such as images, videos and knowledge check questions.
Example 1 – 2-level learning template with learning modules and folders
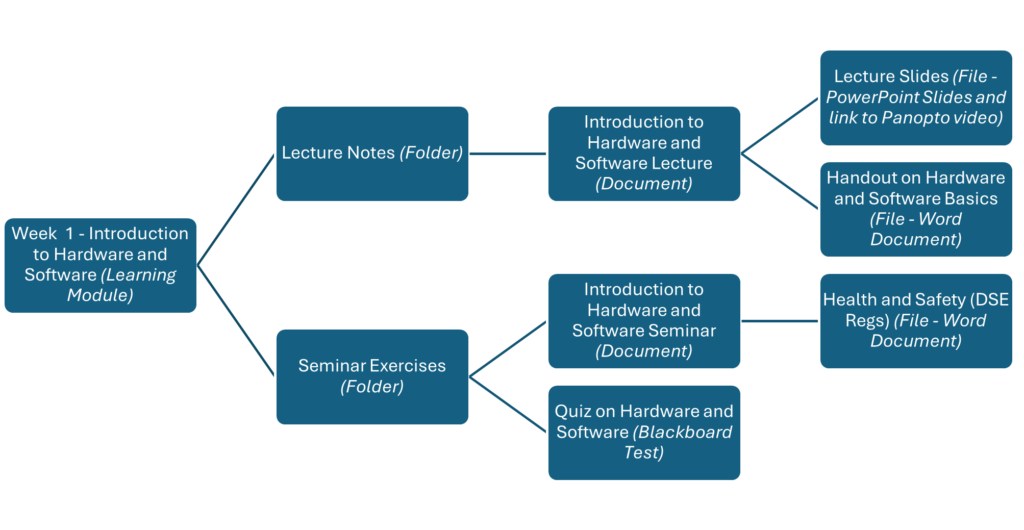
In the example below you can see that the template is structured into weekly learning modules. Each learning module includes two folders, one for lecture materials and one for seminar resources. Each week the lecture slides which includes a link to the recording from the lecture will be uploaded to the Lecture Notes folder along with any handouts. Word documents work well and can easily be checked for accessibility before uploading. This makes it simple for students to download their own personal copy of any handouts to edit/annotate. Exercises, preprepared files and handouts as well as a Blackboard quiz to check week one learning can be uploaded to the Seminar Exercises folder. Week 3 is a formal assessment week. A learning module has been created and this contains the Blackboard Assignment as well as a folder containing revision materials.

Example 2 – 3-level learning template with learning modules, folders and documents
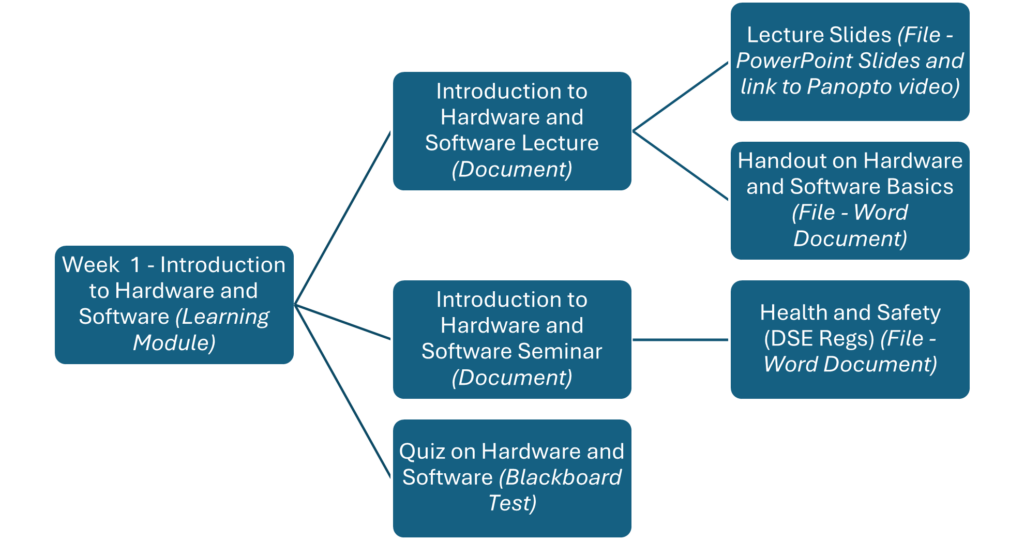
In this example the folders still exist but are embedded within the Document structure. The files be wrapped with more explanatory text, images, videos and links to external materials. This means the student only has to locate one item where they can find all the materials for that one week. The benefit of this is that all of the materials can be made available before the session and the document can be amended with the link to the lecture recording in Panopto. If the folder structure is used instead only then to amend the PowerPoint slides will require the updated file to be reuploaded.
Example 3 – 2-level structure including documents
In this example, there are no folders, but the documents sit directly in the learning module, one document for lecture and one for the seminars. The Blackboard test (quiz) also stands as a standalone item within the learning module.
Example 4 – Organising materials by topic
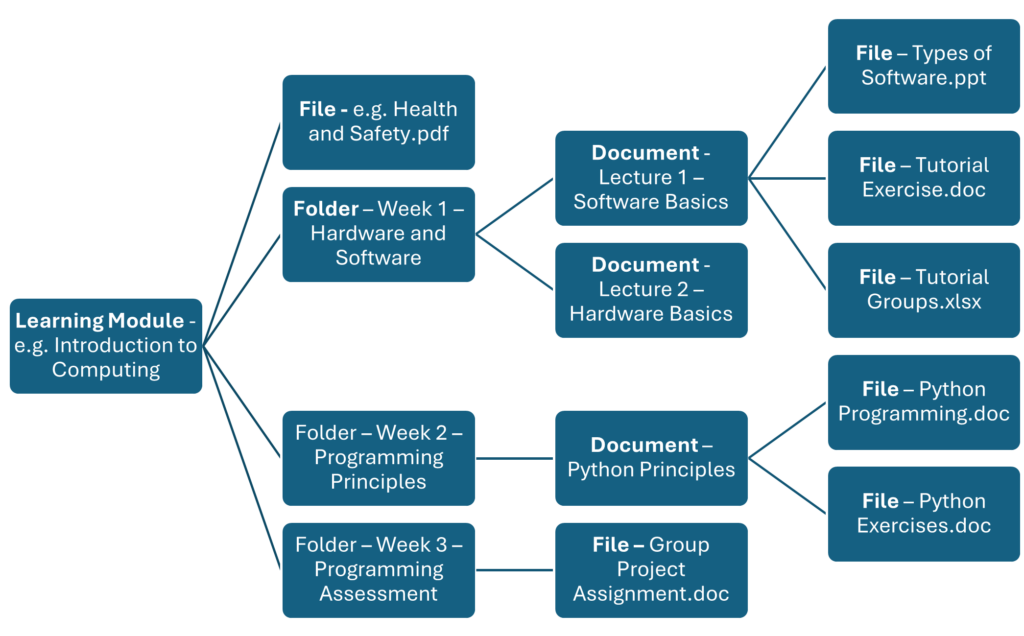
Some departments have made the decision to create a template organised by topics which span several weeks rather than a week by week structure outlined above. In this final example, the learning module represents one topic which may run over several weeks and in this example a folder has been created for each week.
You will notice that the Health and Safety file is a standalone item within the learning module. Files can exist at any level in the structure, i.e. at the top level, within a learning module, within a folder or embedded in a document. It should be noted however, that a document can be placed within a folder but folders cannot be placed inside of document.
Practical Help
Please see our software pages for specific help on organising learning modules, folders and documents.
Key Message: However you structure materials and files in your learning modules, folders, and documents, they should be clearly named to make it easy for the student to locate the relevant materials.
Step 2: Create a folder structure
In the area where you store your files, e.g. lecture presentations, handouts, notes, etc., create a folder structure which replicates the template your department has agreed as outlined above. This should be your university OneDrive,OneDrive is backed up regularly so you should never lose any materials. For example, if your template is organised into weeks, then name your main folder with the course code and name. Within this, create a set of sub-folders with the week number and topic name, then create further subfolders for the lecture and seminar materials for example.The main level is your Learning Modules, these may contain Folders, Documents and Files.
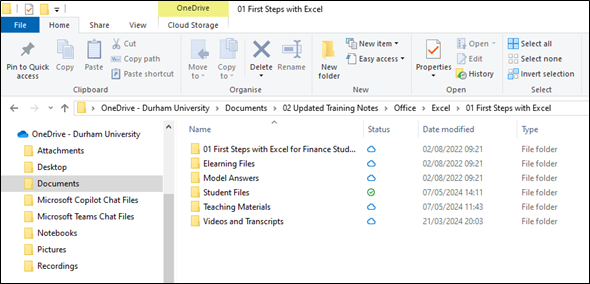
This example shows the course “Office” which contains a learning module for “Excel” and a folder called “01 First Steps with Excel”. This contains folders which will include the materials to be included in the document. These are grouped into folders called “Elearning Files” which contains the main teaching materials, “Model Answers”, “Student Files” which contain the exercises, “Teaching Materials” which contains the lesson plan and an additional folder including “Videos and Transcripts” which will be included in the document.
Step 3 – Move your files into the folder structure
It is now time to do some housekeeping, locate all of your files and move these into you new folder structure. If you have elements such as images you will be including in your documents, ensure these are clearly labelled and placed into the relevant folder too, e.g. Figure 1 Travel Quilt.jpg.
Check all of your file names and ensure these are easily identifiable as these names will be visible to students if you attach or embed the files into your folders or documents. If you have any files you are not using at this time but wish to keep, add “old version” to the file name. If you no longer need them, then delete them.
Step 4 – Check your files for accessibility
Check all of your files for accessibility before uploading to Blackboard. Microsoft Word and PowerPoint include an accessibility checker to assist you with this.
Blackboard also has its own accessibility checker called Ally. For those files which are already uploaded to Blackboard courses, you can obtain reports on the accessbility of your files.
Practical Help
Please see our software pages for specific help on the Ally Accessibility Tool and Ally Accessibility Reports.
Step 5 – Housekeeping
Review your materials – each summer, or during the academic year, review and reflect on the materials you present. You should review and reflect on your own materials but you may also have feedback from colleagues with whom you are teaching and students’ feedback.
Purging – each summer, ensure that you check all of your materials to make sure they are up-to-date. If you have included Word documents, PowerPoint slides etc, these will need to be updated from your original files and reuploaded to Blackboard. Remember to delete any out-of-date materials when you upload the new version so students are only presented with the most up-to-date version. Remember to check and update your reading list too.
Links to external sources – if you are going to be directing the students to external sources such as YouTube videos, websites, etc then create a list of all the links before you begin so you can easily copy and paste these into your teaching materials. Similarly create a list of links to internal sources such as videos stored in Panopto. These must be checked each year to ensure that they still work.