This is one of the new AI Design Assistant tools in Learn Ultra that have been made available to staff from January 2024. Their use was recommended by the Educational Development Committee in November and approved by Education Committee in December 2023.
Purpose
Use of this tool is entirely optional. It provides suggestions to help you construct a rubric in your Learn Ultra course. This can be linked to range of assessed items such as assignments or discussion boards.
Rubrics provide a structured framework for assessing student work. They can benefit both the learner working on the assignment and the lecturer when it comes to marking the work.
Sometimes in a course, staff may opt to co-design the assessment rubric with their students, to help them identify the key learning outcomes of the activity. In such a scenario you may want to use this tool in the class, to help speed up this process by providing some suggested entries for different criteria.
It is only visible to staff with any one of the following roles in the course:
- Instructor
- Module Administrator
- Course Builder
- Teaching Assistant
Video demonstration
Step-by-Step guide
Finding the tool
The process is very similar for any markable content item that supports rubrics. You begin by opening the item and looking in the Settings panel for the marking rubric entry. You choose to add a new rubric and select the new Generate option.
The exact workflow to get there depends on the content type (and whether it is already setup for marking). If you have just started using Learn Ultra or have never used rubrics before, you might want to follow the detailed guidance below. If you are very familiar, then jump straight to the Getting good results section.
Assignments – step by step instructions for finding the Generate rubric button
Assignments
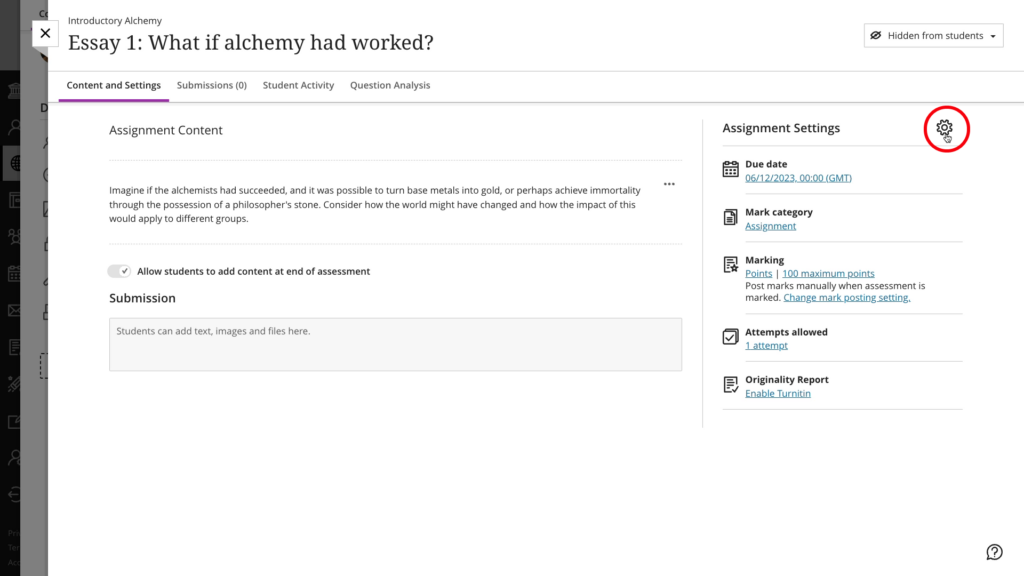
Click the cog wheel icon at the top right of the Assignment Settings panel to reveal all the Assignment settings:
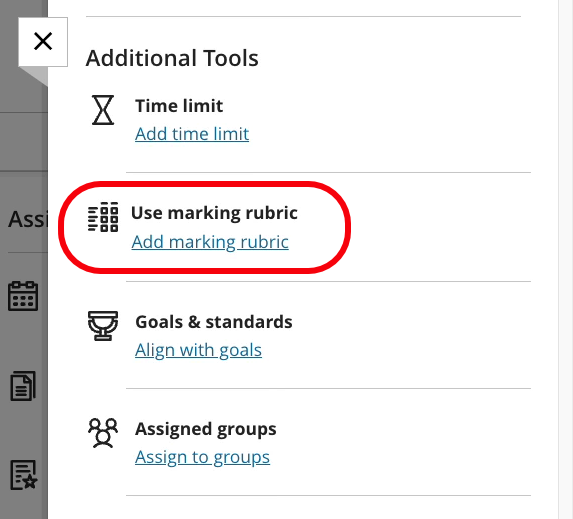
Scroll down the list of options until you find the entry Use marking rubric.
Select the link Add marking rubric
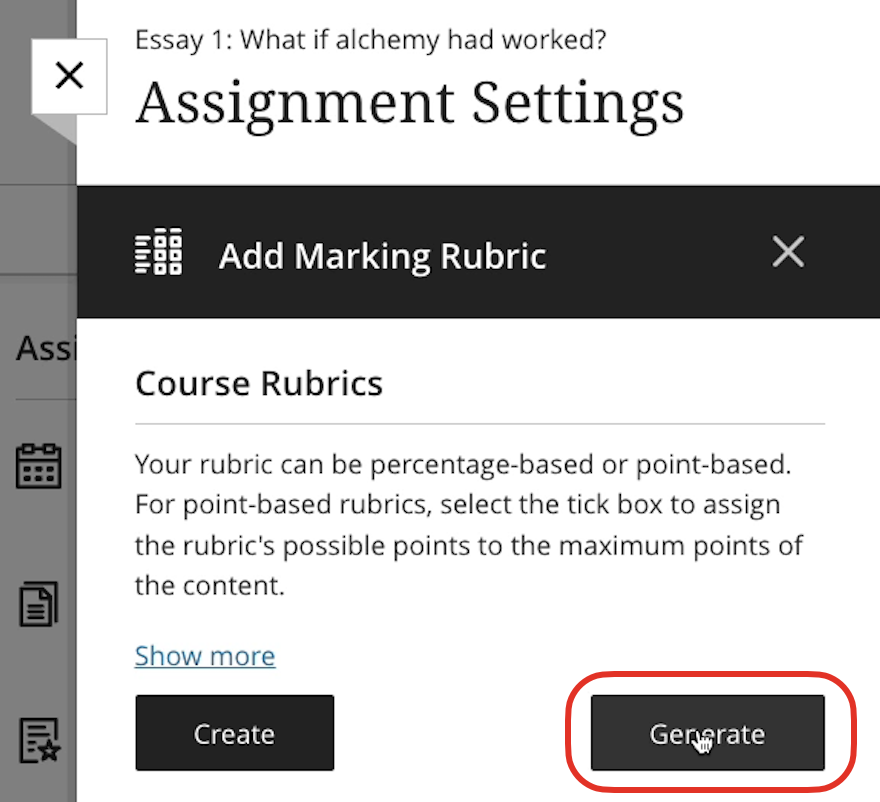
You will then be presented with a list showing any existing rubrics in the course, plus two options to add a new one:
- Create
- Generate
Choose the option Generate
Now continue the instructions from Getting good results
Discussions – step by step instructions for finding the Generate rubric button
Discussion Boards
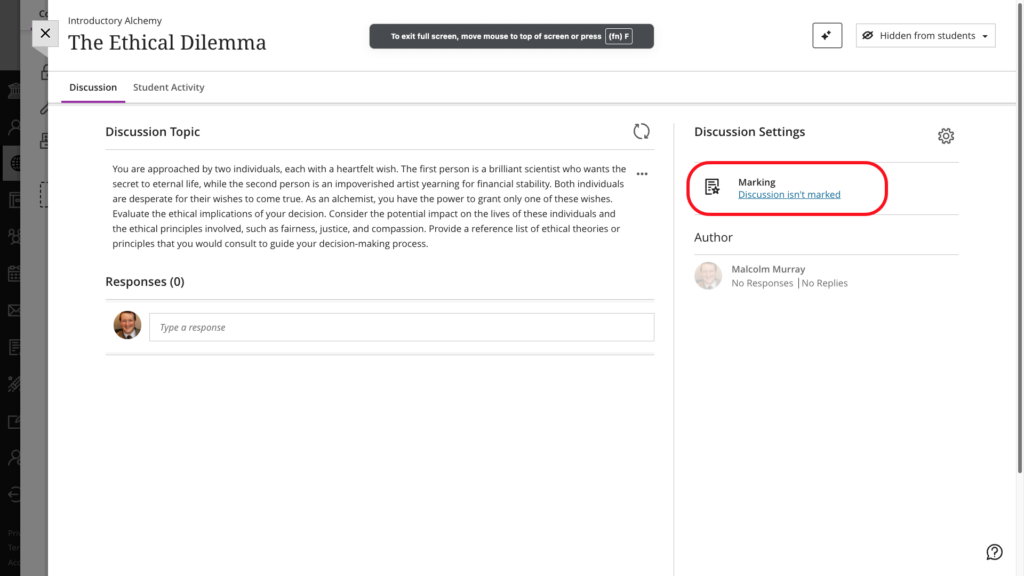
By default, discussion boards are not marked. Therefore before we can add a rubric to a discussion board, you need to check whether you first need to assign possible marks to it.
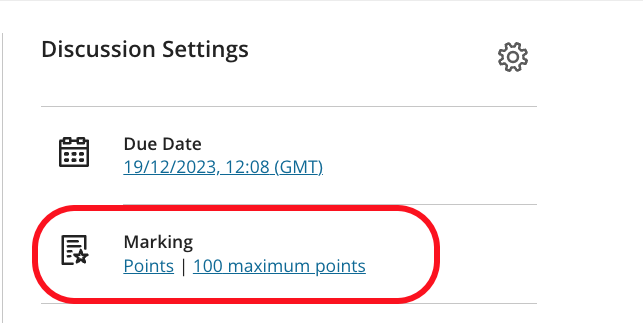
In the Discussion Settings panel, identify the Marking entry.
Marked Discussion
Unmarked Discussion
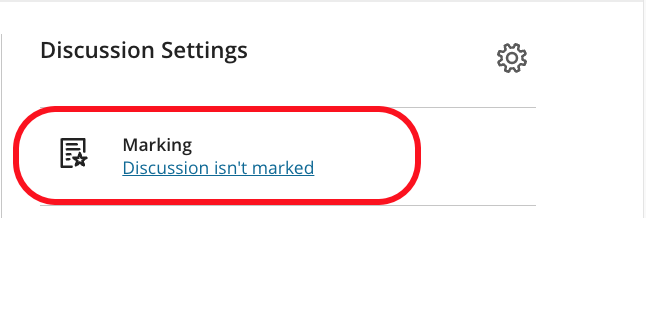
If your discussion hasn’t been set up for marking yet, you need to open the link Discussion isn’t marked. This displays the full Discussion Settings panel where you should first tick the checkbox Mark Discussion, and then set a suitable Due Date and Maximum Points.
If your discussion is already set up for marking, click the cog wheel icon at the top right of the Discussion Settings panel to open the advanced view.
Scroll down the list of options in the Discussion Settings panel until you find the entry Use marking rubric.
Select the link Add marking rubric

You will then be presented with a list showing any existing rubrics in the course, plus two options to add a new one:
- Create
- Generate
Choose the option Generate

Now continue the instructions from Getting good results
Getting good results
After clicking the Generate button, the Generate Rubric page opens:
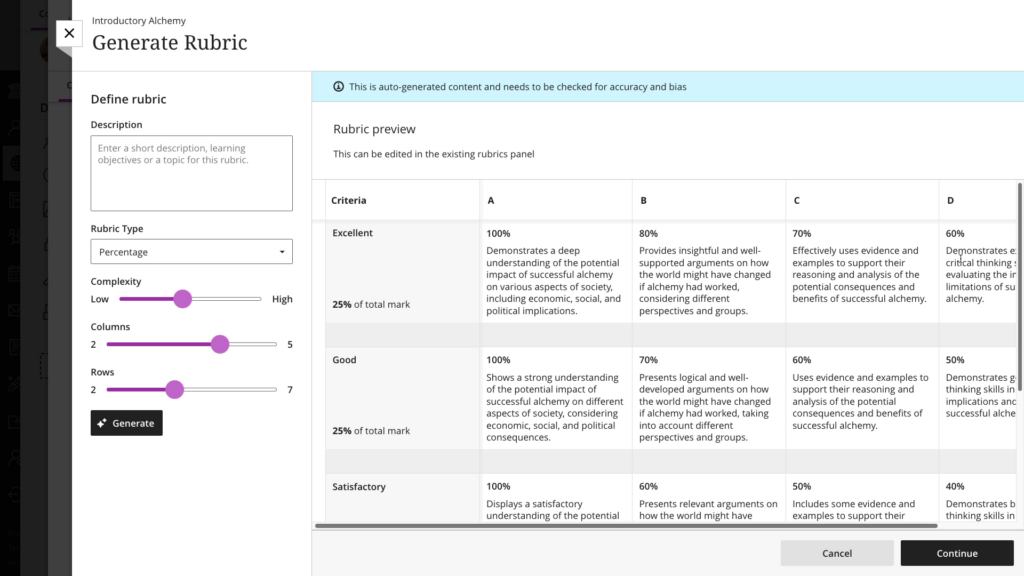
The tool always tries to generate content immediately after being launched (based on the course title), but for best results you will want to configure it using the settings panel on the left hand side and ask it to generate again.
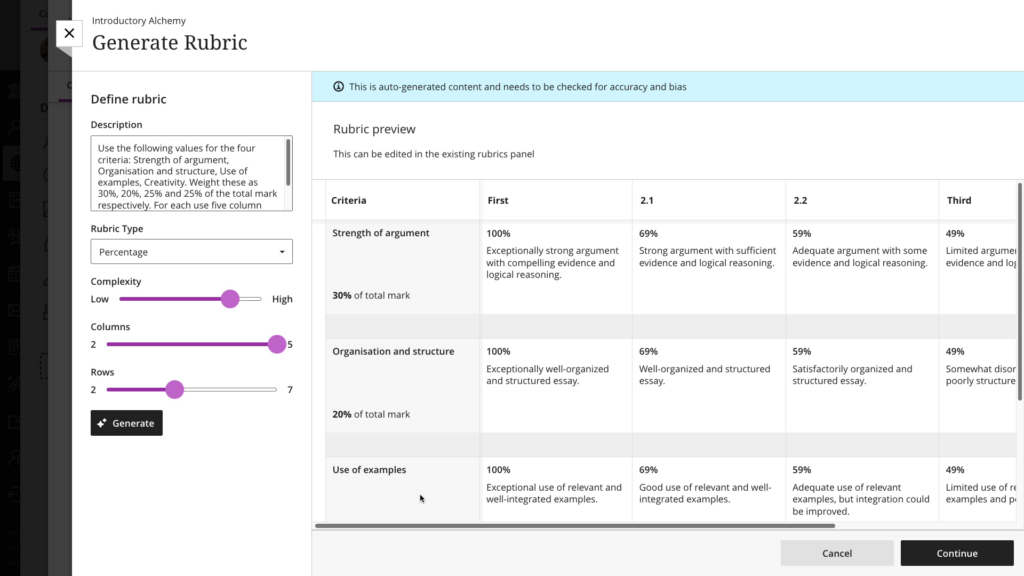
Each field in the settings panel is explained below:
Description
This is a key field that you will need to use in order to constrain the rubric. In the example above the following prompt was entered:
Use the following values for the four criteria: Strength of argument, Organisation and structure, Use of examples, Creativity. Weight these as 30%, 20%, 25% and 25% of the total mark respectively. For each use five column headings: First, 2.1, 2.2, Third and Fail. Associate them with these values: 100%, 69%, 59%, 49% and 40% respectively.Rubric type
This field defines the way marks are awarded. It mimics the options available in standard rubrics, which can be either points or percentage based. Either can assign specific values, or allow you to enter a value within the permitted range. (The Blackboard Rubrics Help Guide opens a new window has much more detail about this). The options you can choose from are:
- percentage
- percentage range
- points
- point range
Complexity
This slider field is used to help shape the reading level of the generated text. The further to the right of the scale, the more complex and technical will be the language. The extreme left is meant to be early primary school, the extreme right, PhD thesis level. Experiment with this to see how it applies to your discipline. Remember that there is no point writing a rubric whose language is so complex that your students can’t understand it!
Columns
Use the slider to indicate how many column you want the tool to generate for you.
Rows
Use the slider to indicate how many rows you want the tool to generate for you.
Generate
Use the Generate button to apply your changes
Accepting the rubric
When you are happy with the basic layout, click the Continue button at the foot of the page. You then see the rubric as it will appear to students, but you still have the option to edit any of the text and fine-tune things.
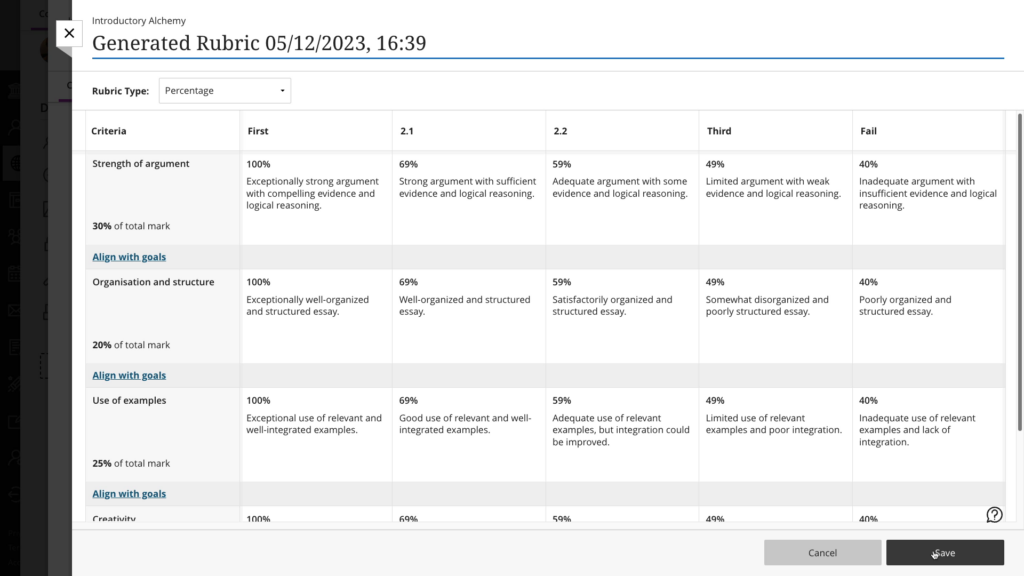
When you have made all your changes, use the black Save button to add the rubric to this course.
Don’t forget to now add your new rubric to the assignment or discussion board, using the Add link that appears next to the name of your new rubric in the Course Rubrics section of the Assignment Settings!
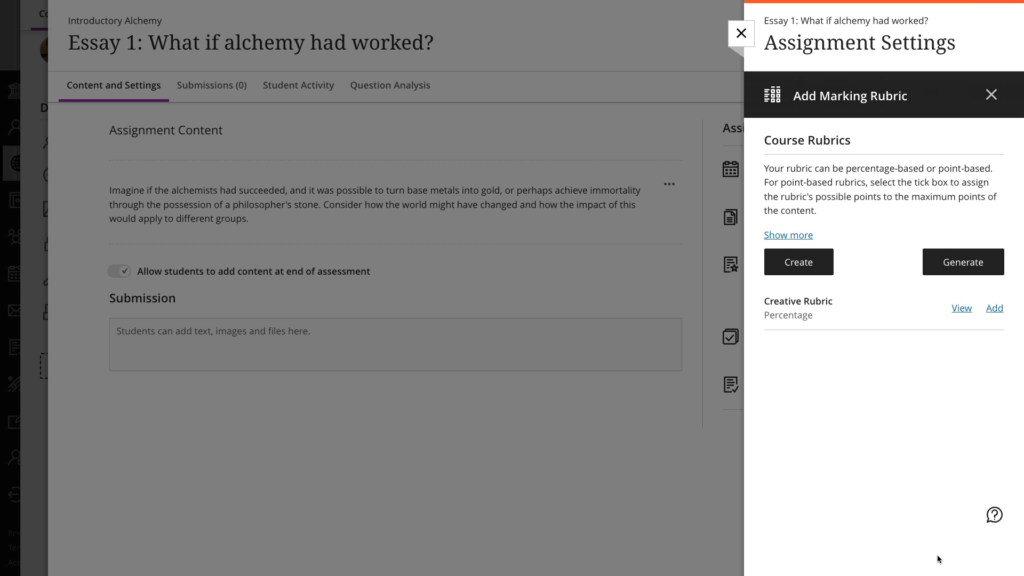
This means that it will be visible to students (and yourself) when it comes to taking and marking the assessment and viewing feedback.
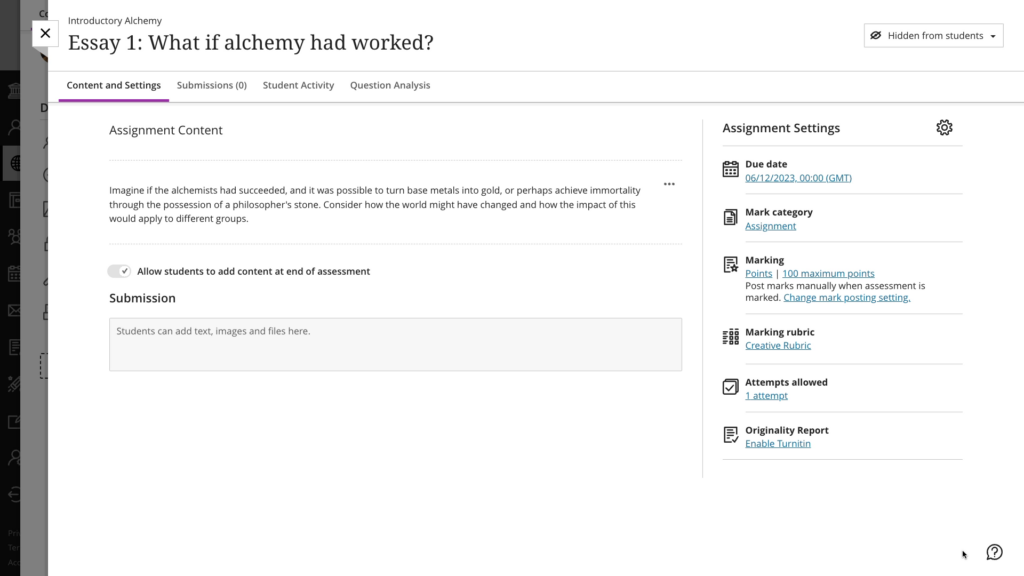
They now behave like any other rubric. You can go back and edit it (with care as it is now linked to an assignment), add it to another content item or copy it from this course to another.
Acknowledging AI use
When the tools were approved at Education Committee a student rep suggested that staff should acknowledge their use in the course, just as we ask students to acknowledge the use of generative AI in their assignments. This was seen as good practice and the recommendation approved.
Our AI Design Assistant: Acknowledging Use page provides some suggestions.
