What is Chirun?
Chirun is an open source tool created by Newcastle University that produces flexible and accessible course notes, in a variety of formats, from LaTeX or Markdown sources. It is aimed primarily at the creation of accessible notes for mathematical sciences and related disciplines.
It supports multiple outputs and can produce HTML web pages that can be easily viewed on desktop, mobile or tablet. It may also produce slides that can be used to give a presentation or lecture, or print-ready PDF, or a Jupyter notebook.
This guide details its specific use for the creation of HTML page content for use in Durham University’s Blackboard online learning platform, where LaTeX output files are converted on the fly using an LTI integration between Learn Ultra and the Chirun tool. Users must have at least Instructor level access to the Blackboard module concerned for this to work.
The guide presupposes that LaTeX-generate files are already available and ready to be uploaded into Blackboard via the Chirun LTI integration. Creation and editing of the LaTeX source files (to resolve errors picked up by the Chirun tool during the conversion process) are not covered by this guide.
Adding the Chirun output to your Blackboard Course
Adding the accessible HTML file content to your Learn Ultra module is done via an LTI integration between Blackboard and the Chirun tool. This is accessed through the ‘Content Market’ area in Blackboard.
- Navigate to the place in your Blackboard Course where you wish to place the Chirun-generated content.
- At the relevant place on that page click the Plus icon ⊕. From the Add New Content Item menu click Content Market.
- On the Content Market page, click the Chirun tile (Image 1).
- The Pick a package to use page from the Chirun LTI tool is displayed (Image 2). Recently used files are displayed at the top in case they need to be selected again. This example will follow the Create a new package route. There is also an option to import a package via its URL if this has been noted own from a previous use of the Chirun tool.

Creating the Chirun Package
- Click Create a new package.
- You are taken to the Create a new package area of the Chirun LTI integration.
- Click the Choose files button.
- Navigate to the folder where the Chirun package is saved, select it and then click Open.
- The package file name is returned to the text field of the Upload files area. Click Upload.
- The package then needs to be processed (built) by Chirun. An interstitial page says The package has not yet been built. Please build it to continue. Click the Edit or build this package link.
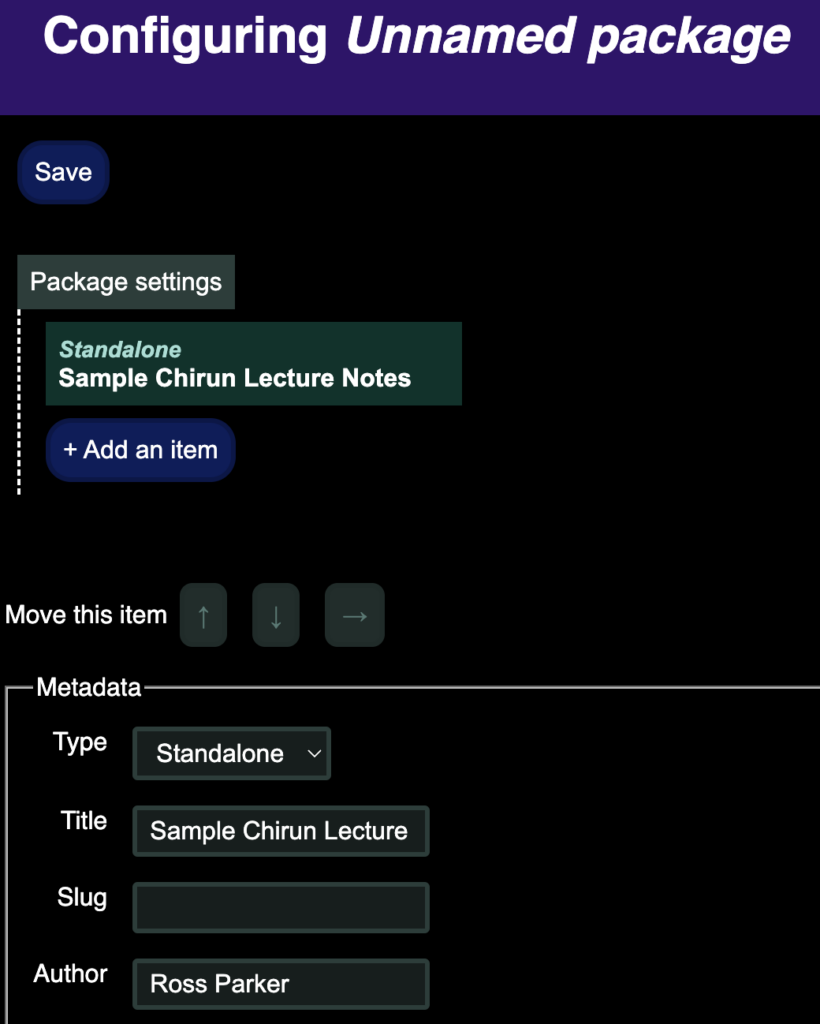
- A new browser tab opens and displays the Package Details page for the package. Under the Actions heading click the Configure button.
- On the Configure page, add optional metadata such as Title, Author, Institution, Course Code.
- You can also click on the individual files (Sample Chirun Lecture Notes) and add metadata (Image 3).
- When you’re done, click Save.
- You will be returned to the Chirun dashboard a message saying the package is being built.
- Click on the hyperlink to the build. This will like named in the format [Year-Date-Time-Building].
- You should see a log of the package. Depending on the complexity of the package, this process may take several minutes.
- Once the building process is completed, Chirun reports this with a message at the top of the page.
- Errors – If the package fails to build, you may need to make some changes to the original file. For more details go to the error reporting section.
- Click Back to return to the Chirun dashboard.
- Close the browser tab that opened to allow the Chirun package to be built. On the LTI Launch Blackboard page, you should see the same page you used to create the package. This time though, it should show your new Chirun package under the pick a package to use options.
- Click the link to the new item you created.
- On the next page pick an item to use link. The items that might be used as the start item for the Chirun package are displayed.
- Click the link of the item to be chose. This will be the first item that loads when students click a link in Blackboard. In this example the Sample Chirun Lecture Notes page.
- A preview appears to show what this will look like. The preview area shows what the display will look like to students. Click the Use this choice button to use this page or the Choose something else link to go back a step and select another item.
- You are returned to the original page in Blackboard with the link to the Chirun item added and, by default, visible to students.
Previewing the Chirun item in Blackboard
- You can use Student Preview in Blackboard to see how the Chirun package will be displayed. If you can’t see it in Student Preview, ensure the item is set to Visible to students.
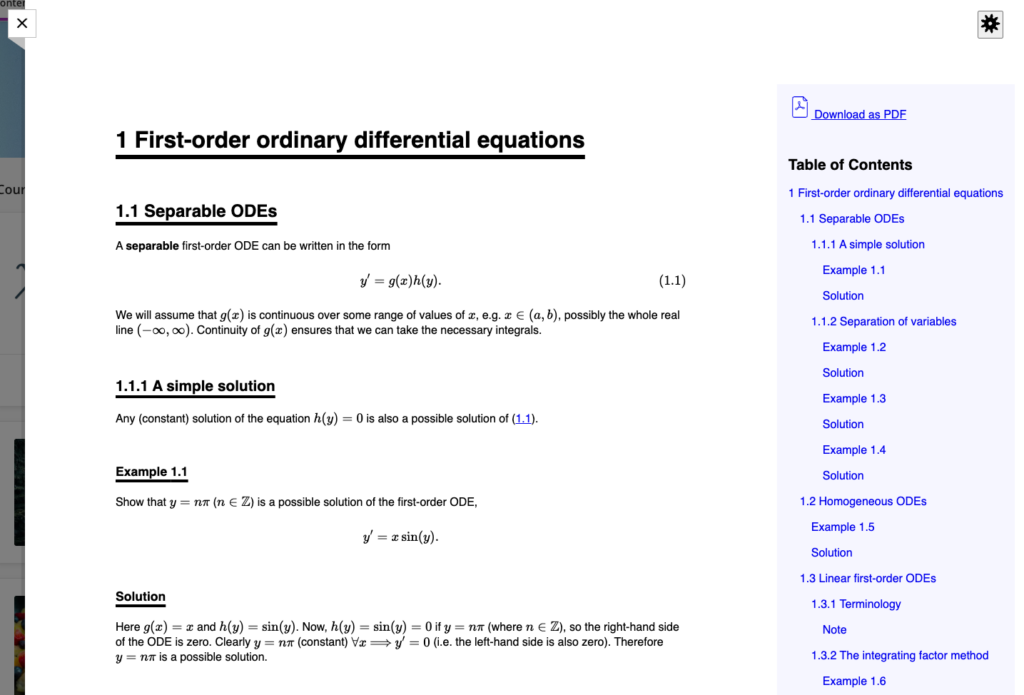
- In Student Preview mode, click the newly added link to view the accessible maths item added via Chirun. Image 4 shows an example of what this might look like. You will see the content is displayed in HTML, with links for each section. There is also the option for students to download a PDF version too.
- The Settings button (allows the students to change the settings for their display.
- Options that may be adjusted here are:
1 – Reset changes to defaults
2 – Alter the text size (displays by default at 100%, range is 50% to 600%)
3 – Change the font type (the options are sans-serif, serif, Atkinson Hyperlegible and Comic Sans)
4 – Apply a sepia filter
5 – Increase (or decrease) spacing (down to 0%, or up to 1,200%)
6 – Apply a colour scheme
7 – Rotate hues (between 0% and 100%)
8 – Invert images in dark mode
9 – Read the Chirun accessibility statement
10 – Close the settings area - You may experiment with these settings to see the functionality for yourself without impacting how any students see the page, as these settings are applied by the user in their browser when viewing. The page will also be more easily read by a screen reader device.
Common issues and how to diagnose them
When converting from LaTeX, you may run into errors that prevents the Chirun package from building. During early testing, this is often caused by either:
- Unsupported LaTeX packages – Chirun supports many LaTeX packages, but it may be that you’re using something that isn’t yet supported. To check, visit the LaTeX compatibility — Chirun 0.8.0 documentation web page.
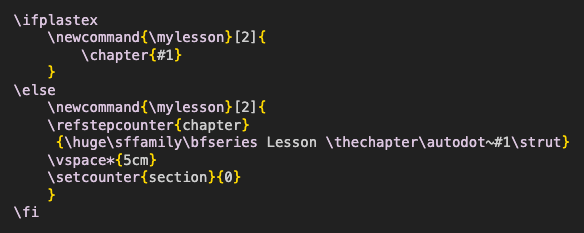
- Commands specific to PDF output – Your document may have a very long preamble, containing commands which change the layout of the page or font sizes and styles. While these are important for the PDF output, they will not have any effect in HTML output. To get around this, you can create short conditional statements using \ifplastex (Image 5).
- Multi-file naming issue – In LaTeX, the
\input{name}command is used to include the content of another file into your main file. However, Chirun only works correctly if the filename.texdoes not exist. If it findsname.tex, Chirun expects it to include a special LaTeX command called\begin{document}, which is typically only in the main LaTeX file, not in files meant for\input. To fix this issue, rename all input files to remove the.texextension. This ensures Chirun doesn’t try to process the input files incorrectly.
Click the link to view the Build log, where the full log of the package creation process is shown. Use this to find any errors.
Amend the original file(s) in LaTeX, export them from LaTeX and restart the process of uploading to Blackboard using the Chirun LTI integration.
Reporting bugs and errors
If you find a LaTeX package that you require, but find it isn’t supported, you can request for a new package to be added. There are no guarantees, but the Chirun team at Newcastle will consider if it’s possible. You can also report bugs on this page too.
Further information and support
Newcastle University maintains a Chirun documentation web site for this open source tool.
For help with using the Chirun tool in the Faculty of Science at Durham University, please contact the Faculty of Science Digital Learning Developers team: sci.digilearningdev@durham.ac.uk.