This Student quick start guide aims to provide you with the key information that you need to help familiarise yourself and become confident using Blackboard.
Accessing Blackboard
Always log in to Blackboard using this address: https://blackboard.durham.ac.uk opens in a new window.
If you are prompted, enter your University credentials.
These are:
- your username@durham.ac.uk (something like urxl569@durham.ac.uk)
- your password
Updating your profile
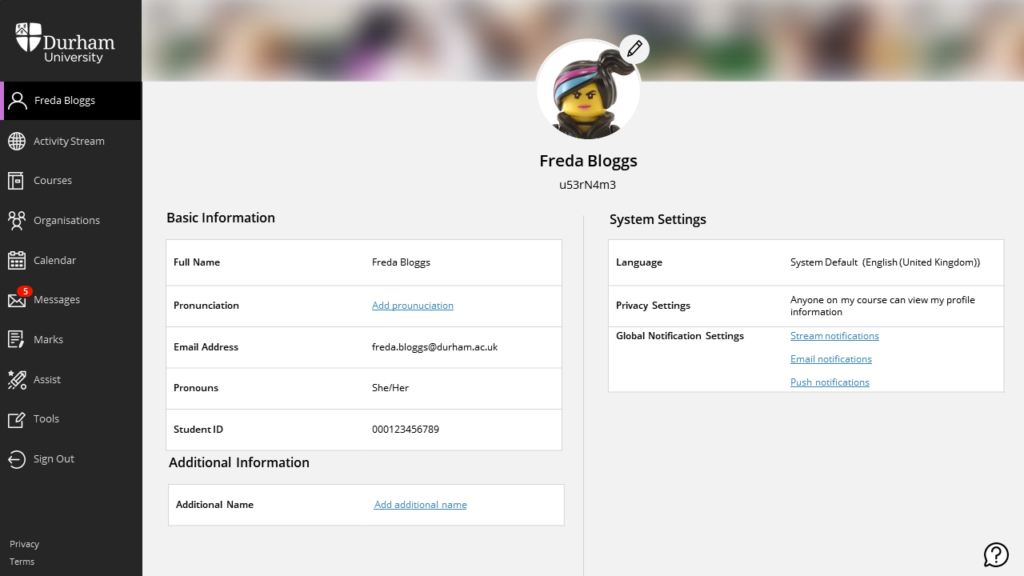
Once you have logged in, we recommend that you check and update your profile page. Completing your profile page is important because it impacts how you appear throughout the system to both your educators and to your peers. This allows you to share key information about yourself, and to make decisions about how you would like to be presented and addressed.
To access your profile, select your name from the left hand menu to open your profile page. Note that some information is fixed (such as your Student ID), but there is some that you can edit. To make an edit, hover over a field and select the pencil icon when it appears.

The following fields can be edited:
- Pronouns – select the pronouns drop down list and you can select your preferred pronouns.
- Pronunciation – You can add details about how to pronounce your name by selecting ‘add pronunciation‘. This will lead to a sub menu where you add a phonetic spelling of your name. You can also record a voice note of the pronunciation. You can use an online tool such as Phonetizer [External Website] to convert your name into the phonetic pronunciation using the International Phonetic Alphabet (IPA) standard.
- Profile picture – this will be visible to other members of the University and appear next to your name in class lists, discussion board posts etc. To change it select the pencil icon and upload an appropriate picture to represent yourself. If you would prefer to use an avatar rather than a picture of yourself, that is also fine.
- Additional name – by default we use the first name and last name that you registered with the University. If you entered a preferred name into the Student Record System then that will appear in the additional name field. If you want to show only this preferred name you can make that change here. If you have forgotten to set a preferred name, login to the Student Record system and make and save the change. This should then filter through to Blackboard overnight.
Quick Tip: You can also change the Global Notification Settings from this profile page. This includes Activity Stream, Email and Push notifications. Remember that the changes will affect notifications for all of your courses!
Finding Help
The question mark icon at the bottom right of the screen will lead you to the Blackboard help guides. When you click the icon, it knows what page you are on and your role in the course and uses this information to try and open the relevant page.

Alternatively, you can refer to the DCAD Digital Learning Help Guides (which you are reading now) for more information on using Blackboard and other educational software.
Keeping up to date with the Activity Stream
When you login to Blackboard you will be taken to the Activity Stream page. This page provides you with an up-to-the minute news feed of all activities across your courses.
The Activity Stream items are grouped into four categories:
- Important: This could include overdue assignments, tests and graded discussions. While this information may be helpful, always refer to the deadlines outlined in the Module Handbook for each of your modules, and if in doubt, ask your Module Convener for more information.
- Upcoming: This presents a view your of ‘top five events’ in Blackboard that will happen in the next seven days. This might include upcoming deadlines for assignments.
- Today: This presents a view of everything happening or work that is due in the next 24 hours
- Recent: This view presents streams that were were previously in the ‘Today’ section over the last seven days.
By selecting the activity or event listing, you are taken directly into the relevant items within a Course.
Courses and Content
Viewing your assigned courses
View and access all of your courses from the Courses Page.
You can view your courses as a list or as a grid. To swap between the two views, select the list/grid icon at the top left. In the image below the “grid” view is selected.

You also have the option to search, filter or display selected courses.

Quick Tip: Select the star icon to ‘favourite’ a Course i.e. courses that you access regularly. This will place the course at the top of the list with a purple star! You can unfavourite a course by selecting the star icon again.

Inside the course
From the Courses page, select the name of a Course to open it. All Blackboard courses have a standard layout which consists of:
- Navigation bar along the top left
- Details and Actions menu on the left
- Course content area – which is the main part of the screen
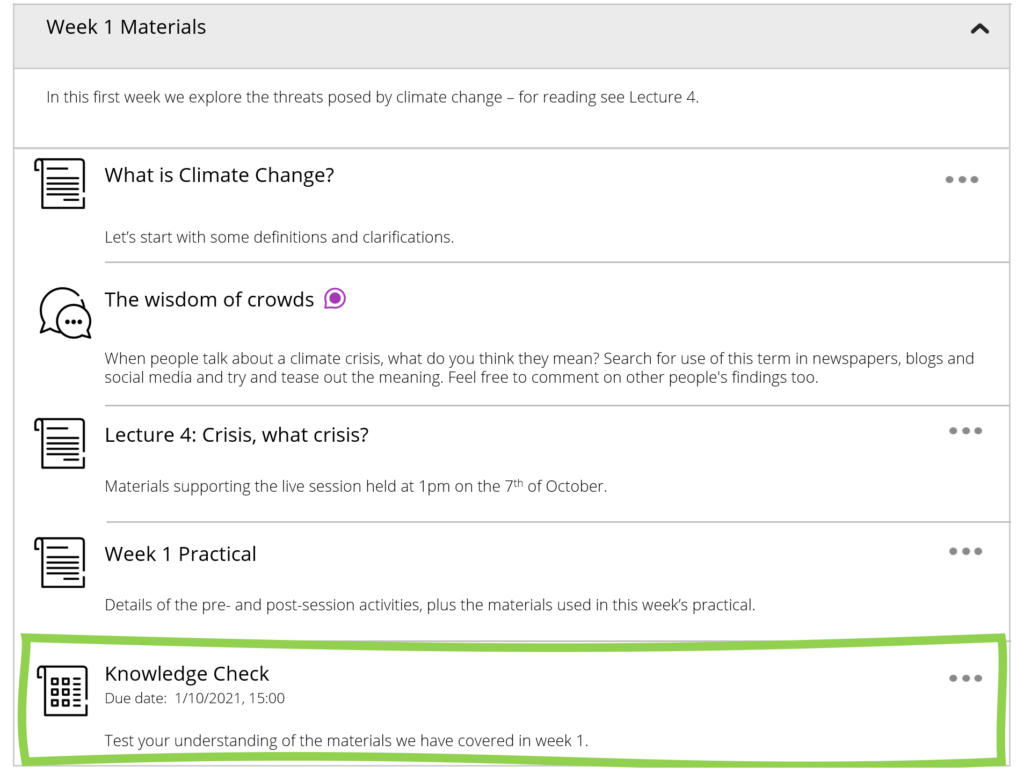
Inside this Course Content area, you will find a mixture of individual items and a sequence of activities generally located with a Learning Module or a Folder.
Learning Modules
Your instructor may choose to categorise learning modules by weeks, topics or using a combination. Usually a Department organisesCourses in a consistent way – so this shouldn’t diverge too much from Course to Course.
You will also find a ‘Start Here‘ section at the beginning of the Course Content. We strongly recommend that you review the ‘Start Here‘ section before diving into your learning materials, as this this section includes key information such key dates, module information and how the module will be assessed, key contacts and links to help resource etc.
Select the grey box/container to expand and view the content items within a learning module.
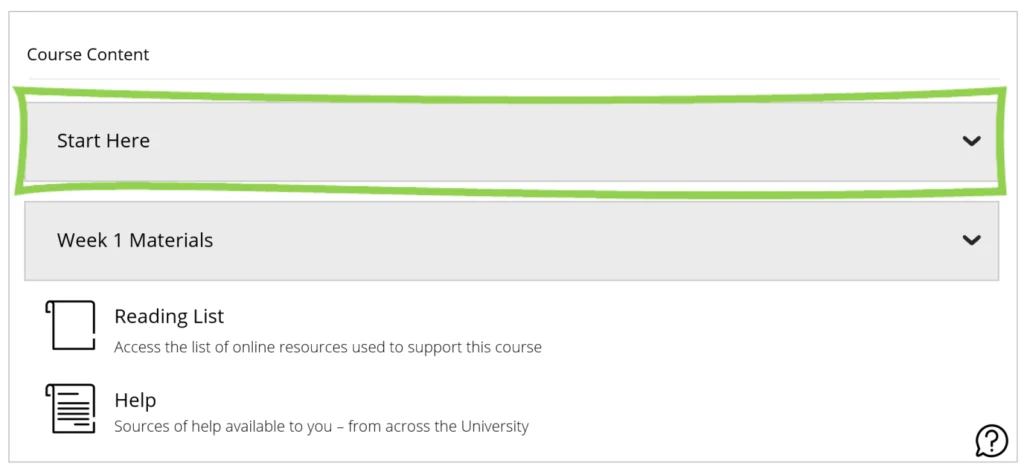
Learning Modules usually present content items in a logical sequence (e.g. you in an order that you should work through from top to bottom). You can select to view or complete an individual resource/activity or view the resources in order.
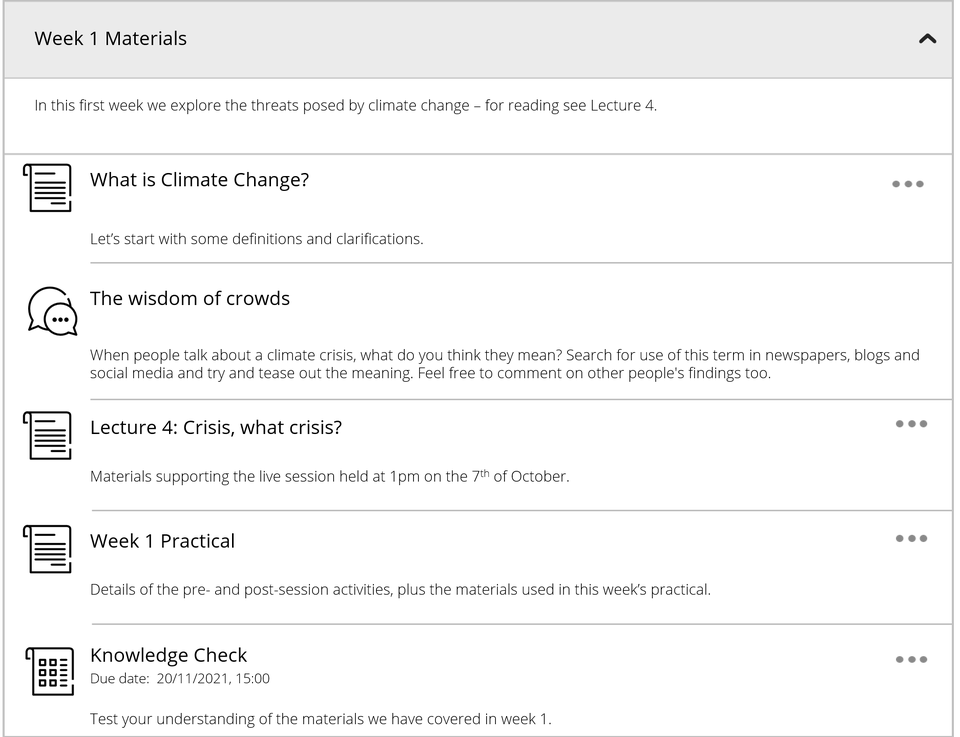
If you see a ‘padlock’ icon next to a content item, your instructor has applied certain access rule(s) to the resource. Sometimes this means that the content will automatically release at a certain date, or sometimes you may need to complete/view an item or attain a certain grade before you can access the next item in the sequence.

If in doubt, always contact your Module Convener in the first instance!
Navigating Learning Modules
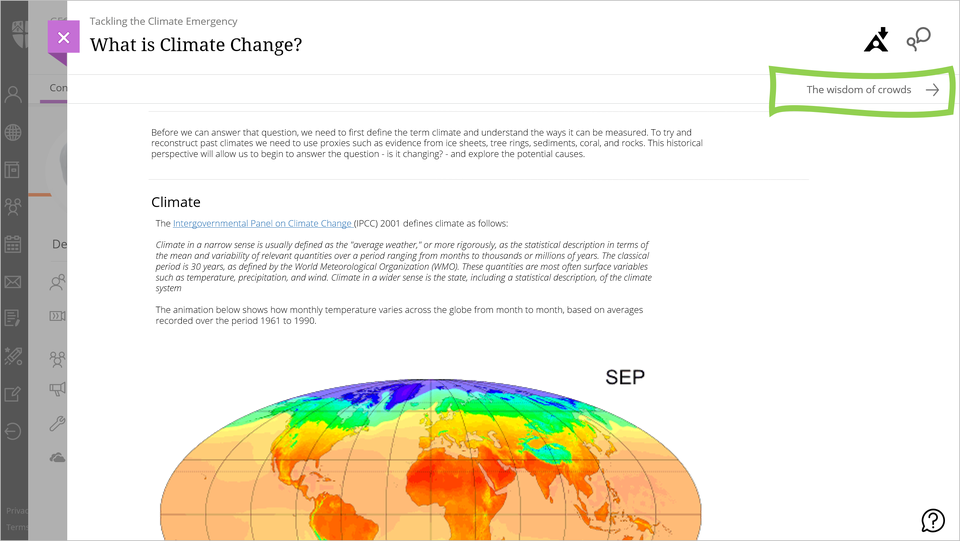
Select an item in the Learning Module, use the arrows (at the top right /left) to navigate and view the course content. This allows you easily move from one item to another in the sequence.
Select the purple close (X) icon on the page to return to the main Course Content area.
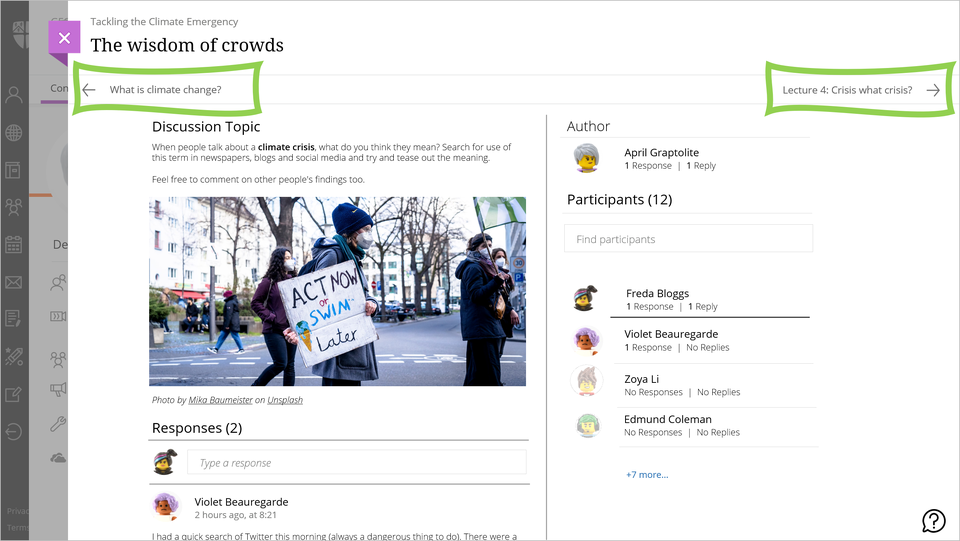
Common Resources on a page
The image below showcases some of the typical resources like textual content, links to reading material, documents/files and video or lecture recordings that you may find within a Content Item.
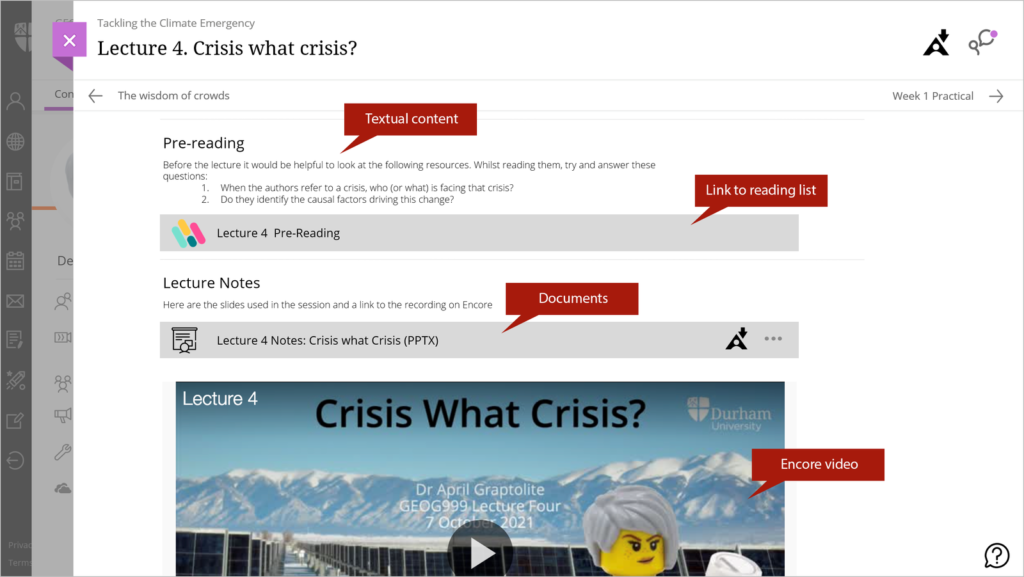
There is now a Print button should you wish to print out the document or save it as a PDF.
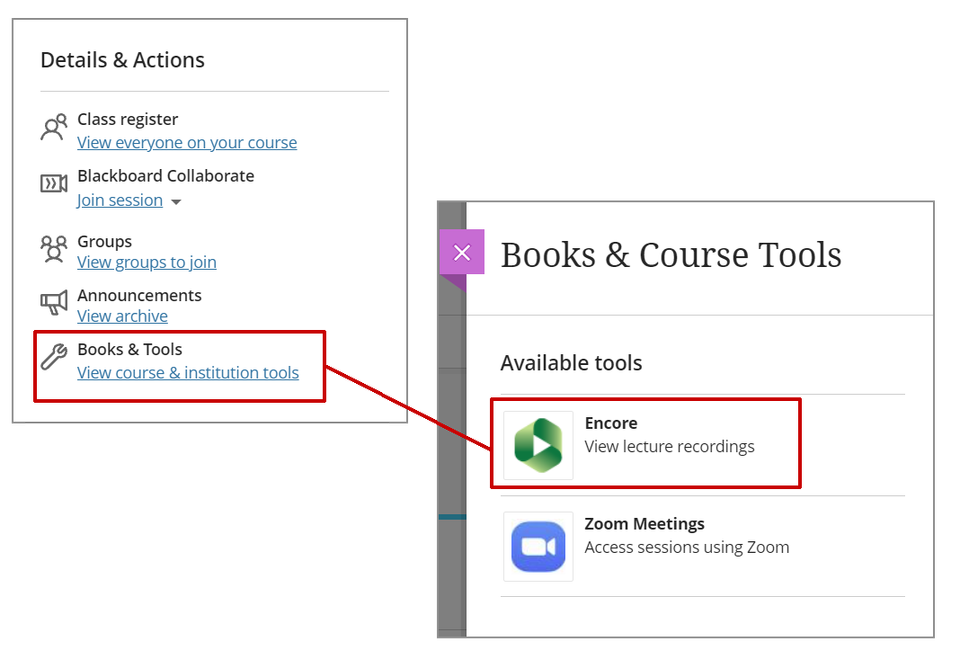
Finding your lecture recordings
If your Encore Lecture Recordings are not embedded in-situ within the course content (as shown in the example above), you can find your recordings either by:
- Selecting View course & institution tools (under Books & Tools in the left hand menu), and select Encore View lecture recordings.
- Navigating to Panopto site: https://durham.cloud.panopto.eu/ and selecting the ‘Shared With Me‘ tab
Accessibility
Viewing alternative file formats
When your instructor uploads files to a course, Blackboard’s Ally feature automatically generates alternative formats of the file based on the original document – so you can choose a format the suits your learning preferences and needs.
For example, if the original file is a PowerPoint document, Ally creates different formats of the same content for you to download, such as PDF, a HTML document (web page), audio file (using automatic text-to-speach), electronic braille, and ePub formats (e.g. for use on a Kindle device).
Please note that given the automatically-generated nature of alternative formats, sometimes things may not appear quite as they should. If you find that you require your learning materials in an alternative format and the files generated by Blackboard Ally do not meed your needs, please contact your Module Convener in the first instance.
To download an alternative file format, select the capital A icon with a downward arrow. From the pop up select your preferred format.

You can download an alternative format for an individual file (e.g. a converted PowerPoint file) or an entire page of content from Blackboard.
Downloading original documents
You can also download the original document by selecting the ellipses (three dots).
Using the Immersive Reader
Blackboard Ally also allows you to access content using the Microsoft Immersive Reader. This tool can also be used across a range of the Microsoft products that you will encounter and use while studying at University, such as Microsoft Word. You can read more information about the Immersive Reader on Microsoft’s help guides [External web link].
To read a page using the Immersive Reader, select the ‘Immersive Reader’ option when viewing the list of alternative formats in Blackboard Ally.

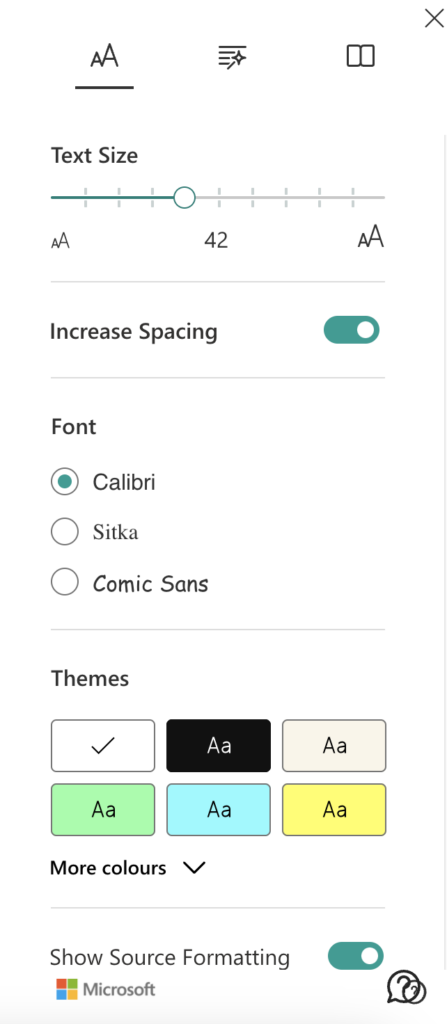
In the upper right-hand side of the Immersive Reader there are controls allowing you to increase the size of the text, increase the spacing between words, change the font, change the text and background colour, as well as the ability to highlight certain words.
At the bottom centre of the Immersive Reader interface you can toggle the ‘Play’ button to start and pause the automatic text-to-speech playback. By selecitng the ‘speaker’ icon with the settings cog to the right, you can make changes such as the speed of the reading and the voice of the reader (male or female).

Participating in class conversations
If enabled by an instructor, you can use this feature to discuss a particular piece of, activity or assignment in Blackboard. If Class Conversations are enabled. select the speech bubble icon to participate in a class conversation. You can start a new thread or reply to an existing post.
The purple spot on the icon indicates a new post. You can also identify new posts/responses to a class conversation from the main Course Content area. This is indicated with a blue speech bubble icon next to the content item.
Note: Class conversations (see Anthology guidance opens in a new window are different to Messages and Discussions and will not appear under these tabs.
Discussions
Discussions are commonly used as a method for you to share your thoughts, work together and interact with your peers, ask questions and demonstrate your understanding or application of the course material. You may be required to participate, as an individual or as part of a group. Your instructor can also grade your contributions.
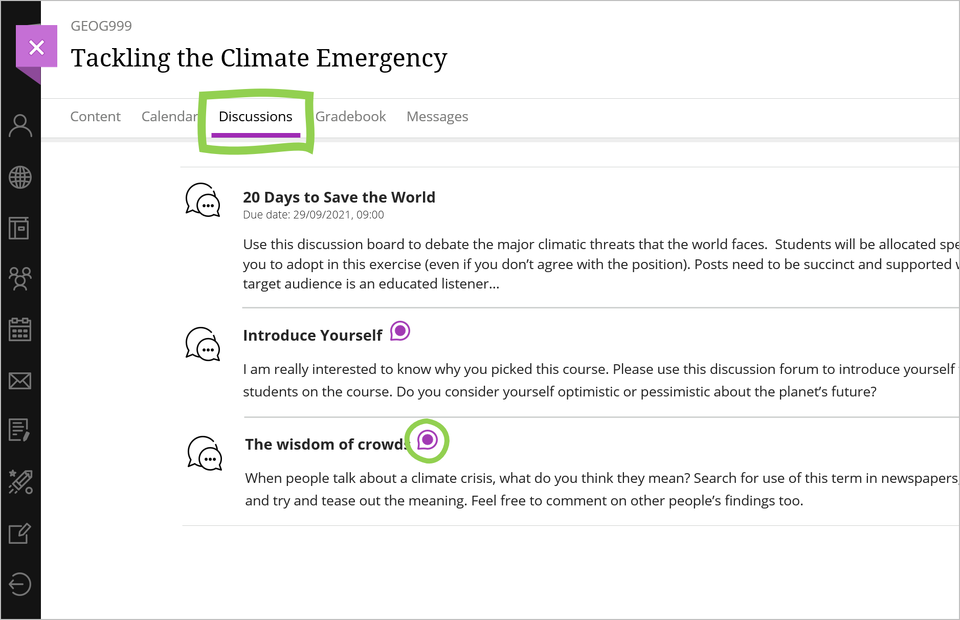
You can access Discussions in your course from two places – the navigation bar at the top left or from the Course Content area.
Selecting ‘Discussions’ on the navigation bar, this will give you an overview of all discussions in your course. This is a quick and easy way to navigate directly to the relevant discussion without having to scroll through your Course Content area or learning modules.
The page also provides a visual indicator (look out for the purple speech bubble icon) next to discussions with new responses or reply.
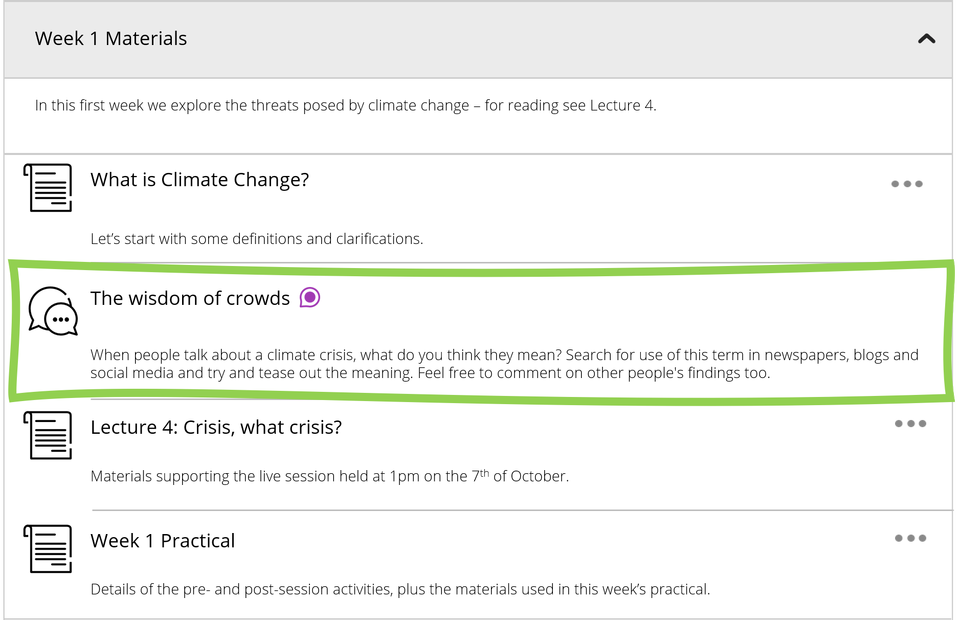
You can also access discussions directly from within the Course Content area, for example from the top level or within a learning module.
Select to expand the learning module and select the discussion title to open it. Discussions with new responses and replies are indicated with a purple speech bubble icon .
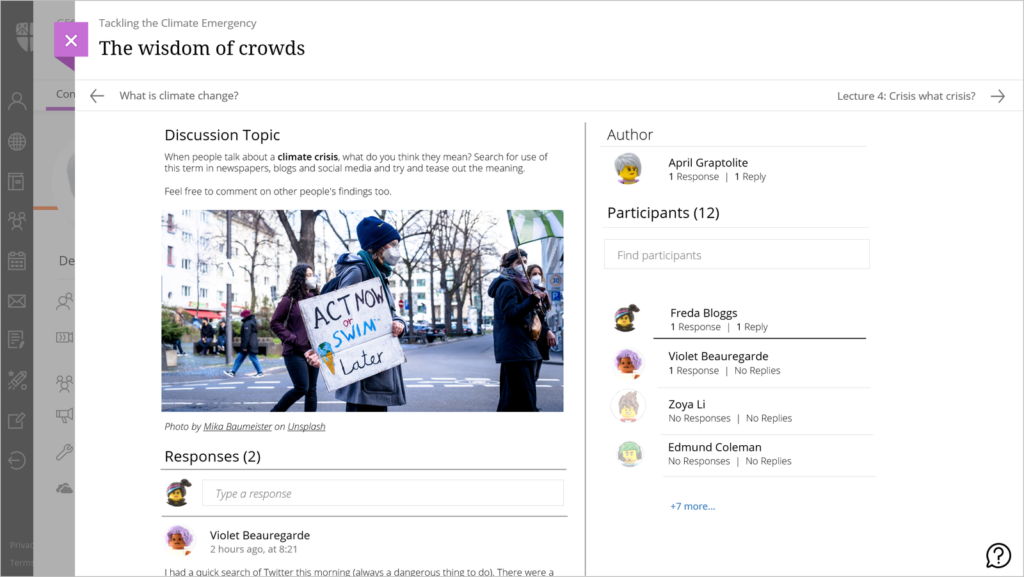
To contribute to a discussion, type a response (to start a new post) or select Reply to respond to existing posts or replies. Use the options in the editor to format text, attach files, links and embed multimedia.
Your instructor may require you to respond to a discussion before you can read other responses and replies. When you open this type of discussion, a message appears: Post a response to see discussion activity. You can’t view discussion activity yet. Responses and replies appear when you post a response.
Submitting Blackboard Assignments
You may be asked to submit both summative and formative assignments through Blackboard, these could be either written assignments such as essays or multiple choice tests.
Viewing the Assignment
- Locate the assignment in the content area and click on it to open. You may have a specific folder for formative and summative assessment. Formative assessment should have a label indicating that it is formative.
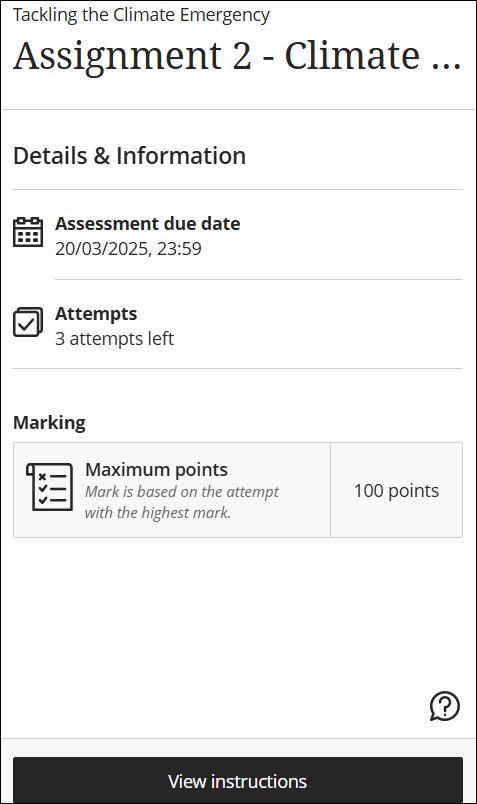
- The Assignment window will open to the left. This summarises key information such as the Assessment due date, number of Attempts you have left for this particular assignment and the Maximum points available for this assignment.
- If the work is to be marked with a Rubric then there will be a link in the Details and Information section to the rubric grid. This will show you exactly how the marks are allocated for parts of the assignment.
- To view the instructions for the assignment, click the View Instructions at the bottom of the window.
- The assignment window will then open to allow you to read the assignment brief (see below).


Submitting the Assignment
- To submit a written assignment you can simply type into the submission area. There are editing tools on the toolbar for formatting. You can drag and drop files to the submission area, or use the paperclip icon to attach documents. This is fine for Word documents, PDFs and PowerPoint slides.
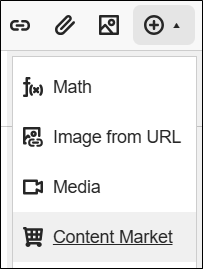
- To submit a video you will need to upload the video to Panopto (Encore) first. To access these videos, click on the + sign and choose Content Market. You will then see the Encore Student Submission Tool. Full instructions on submitting video files can be found on the dedicated help page.

- If you wish to return to the assignment later, click Save and Close. If you have uploaded an assignment but not submitted it, the assignment will automatically be submitted when the due date expires.
- To submit an assignment, click the submit button. If you only have one opportunity to submit, then be very sure that you have uploaded the correct assignment before you click the submit button.
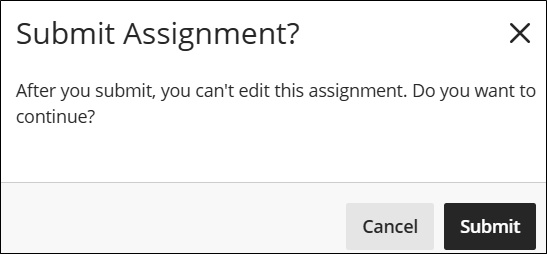
- After pressing the submit button, you will be asked to confirm this.
- You will then see a confirmation notification and will receive an email confirmation.
Accessing grades and feedback
Mark for all Courses
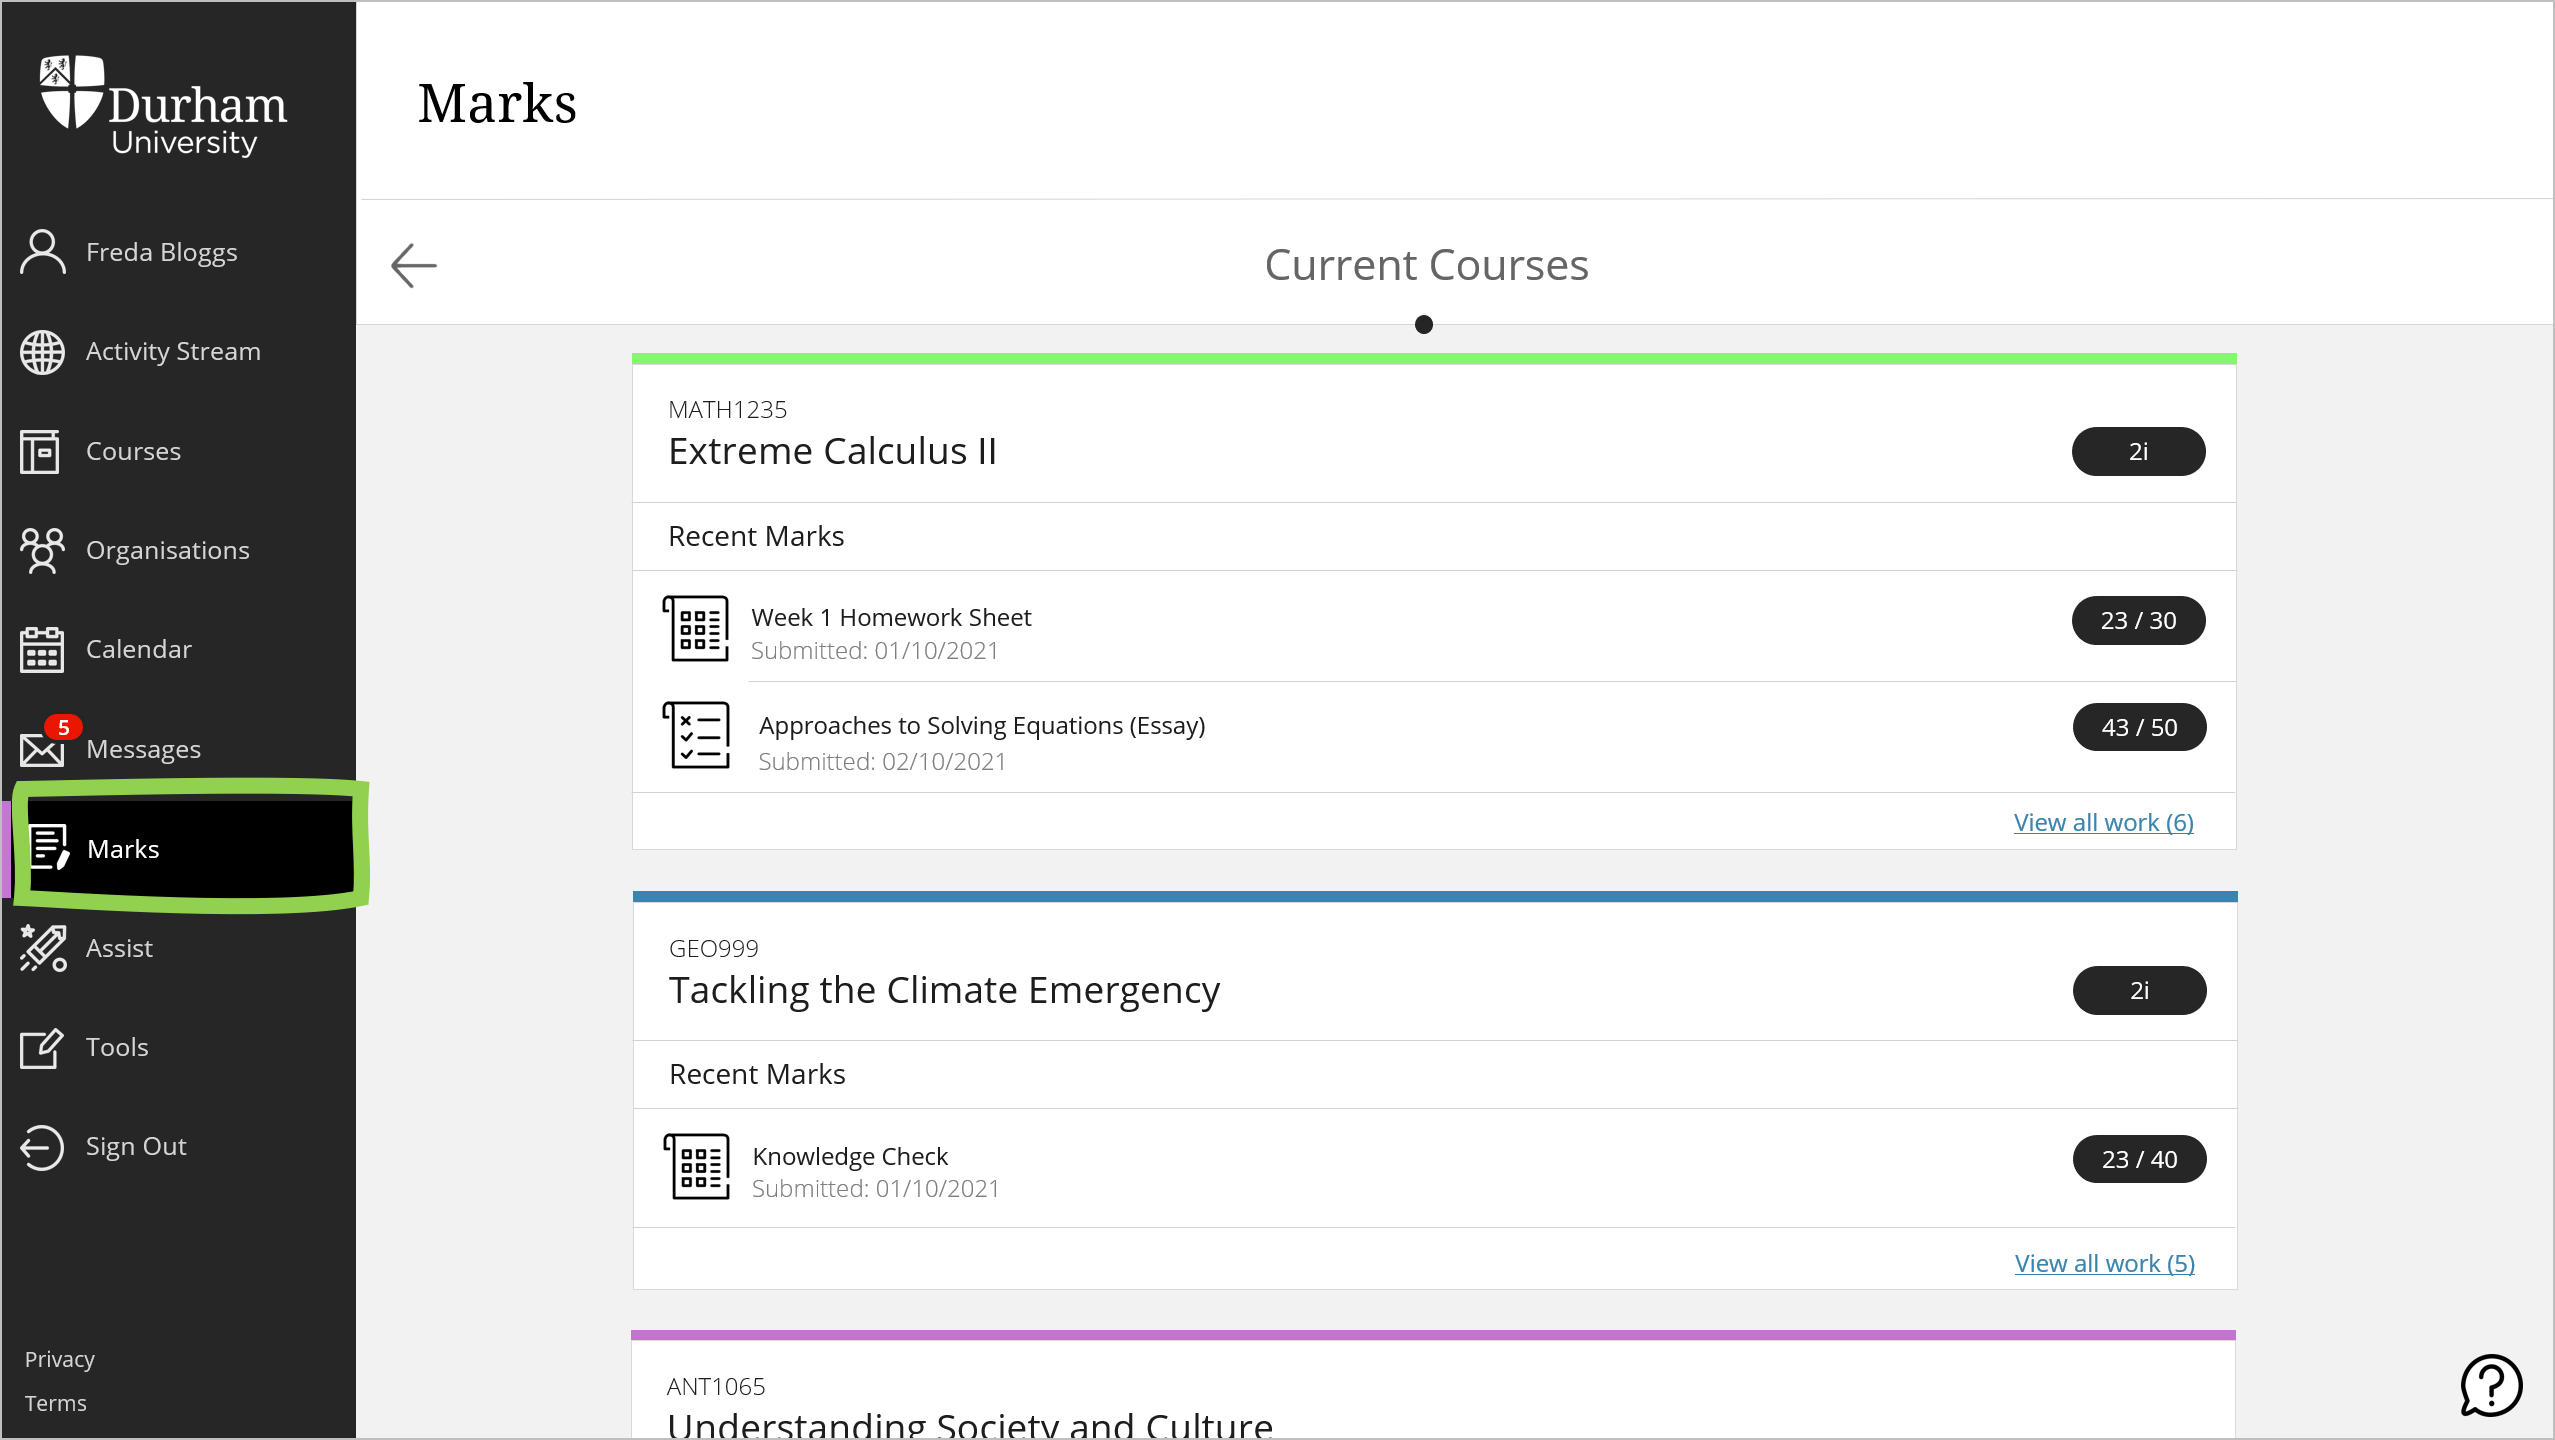
You can view marks for all your course from the global Marks page.
Select ‘Marks’ on the black navigation panel on the left. Your marks are organised by course name, and selecting a course name takes you the course’s Gradebook page. Select an item to see more detail.
If your instructor has set up the overall mark, select the mark pill next to the name of your course to open the panel for more information.
The Gradebook page
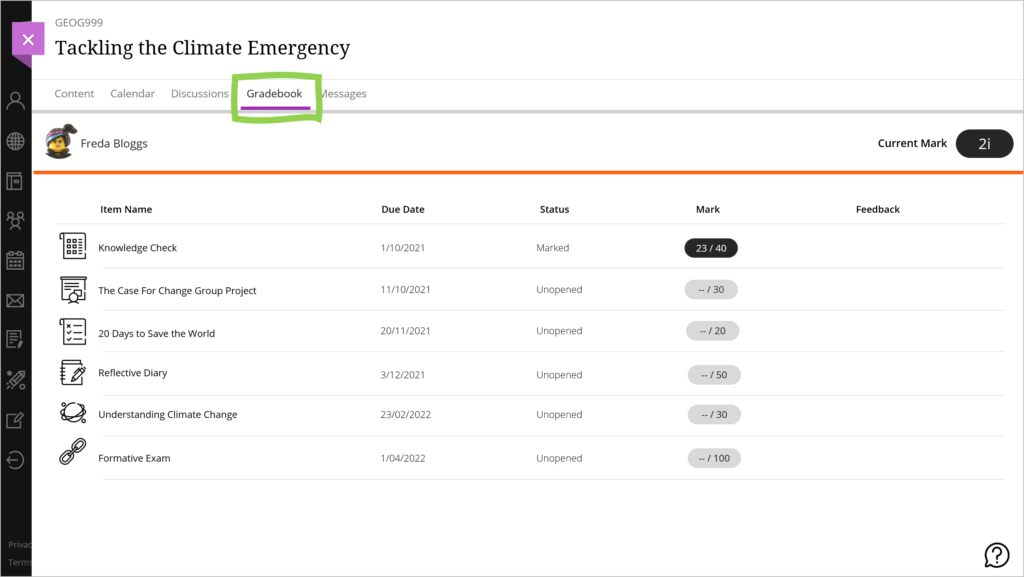
To view your grades for a specific course, select the Gradebook link on the navigation bar at the top left of the course page.
From the Gradebook page, you can access all graded items for your course. For each item, you can view the status, number of attempts, the grade, link to feedback.
Select the item to view your submission details. Any submissions made after the due date will appear in red.
Course item/Submission link
You can also view your grades and feedback by selecting the assessment item or the submission link in the Course Content area.
This will direct you to the submission details.
Viewing marks in the Activity Stream
Whenever your instructor posts mark for an assignment, test, or graded discussion, you can access the grade in the Activity Stream. So remember to check your stream!
Select the ‘View My Mark’ button to reveal your grade. Selecting the Mark posted link will direct you to the course’s Gradebook page.

Viewing Assignment feedback
This would depend on the type of assignment. For the native Blackboard assignment, lookout for the purple square speech bubble icon in the Gradebook page. This indicates that the instructor has provided feedback for your assignment.

Select to view the assignment, and from the pop up pane select to view your submission/attempt. Your feedback will be appear on the panel on the right. You instructor may also choose to leave annotated feedback when you submit a file attachment for an assignment.
For Blackboard tests and quizzes, your instructor can set to automatically score questions with feedback and may choose not to reveal the correct answer until all students have submitted. Select the assignment title (using one of the methods above) to view the the scores, feedback and correct answers.
Blackboard Mobile App
You can access Blackboard on your mobile device using the dedicated Blackboard app or via the browser. The can search for the app called Blackboard and download it to your mobile device from the Apple or Google app stores. Search for Durham University under institution. You will use your university credentials to login where you can access all your courses.
Quick Tip: It is not recommended that you use a mobile app to upload any assignments.
